

Nail Art Designs: Fun and Trendy Ideas to Try Today
Compartilhe agora mesmo:
Hey there, nail art lovers! If you’re on the hunt for some fresh and trendy nail art ideas, you’ve come to the right place. Nail art and designs are all about expressing yourself, and with so many styles to choose from, there’s something for everyone. Whether you’re into bold animal prints or subtle minimalist designs, this article will guide you through some of the coolest nail trends around. Let’s dive in and get those creative juices flowing!
Key Takeaways
- Aura nail art is all about blending colors that reflect your mood or personality.
- Animal prints like tortoiseshell and cheetah are making a big splash in the nail world.
- Magnetic and velvet nails offer a unique texture and look that’s hard to resist.
- Floral designs, especially daisies, bring a fresh and cheerful vibe to your nails.
- Rhinestones add a touch of glam and sparkle to any nail design.
Exploring the World of Aura Nail Art and Designs

Nail Art and Designs
Aura nail art is all about capturing the essence of colors and their energies. It’s like wearing a mood ring on your fingertips, and it’s gaining popularity because of its unique blend of colors that seem to glow from within. This style is perfect for those who want their nails to reflect their inner vibe.
Creating the Perfect Aura Blend
Creating the perfect aura blend is an art in itself. You start by selecting a base color that resonates with your personal energy—think soft pastels or bold jewel tones. Then, you layer other colors on top, blending them seamlessly to create a gradient effect. The key is to let the colors flow naturally, almost like they’re dancing across your nails. You can use a sponge or a brush to achieve this effect, and don’t be afraid to experiment with different tools to find what works best for you.
Color Combinations for Aura Nails
When it comes to choosing colors for your aura nails, the possibilities are endless. Here are some popular combinations:
- Soft Pink and Lavender: For a calming and serene vibe.
- Turquoise and Gold: To bring a touch of luxury and energy.
- Deep Blue and Silver: Perfect for a mysterious and elegant look.
Feel free to mix and match until you find a combination that speaks to you. Remember, aura nails are all about personal expression.
DIY Aura Nail Art Tutorial
Creating aura nails at home is easier than you might think. Here’s a simple step-by-step guide:
- Prep your nails: Start with clean, filed nails and apply a base coat.
- Choose your colors: Select at least two or three colors that you want to blend.
- Apply the base color: Paint your nails with the lightest shade and let it dry completely.
- Blend the colors: Use a makeup sponge to dab the other colors onto your nails, creating a gradient effect.
- Seal it in: Once you’re happy with the blend, apply a top coat to protect your design and add shine.
Aura nails are a fun way to express your mood and style. They allow you to play with colors and create a look that’s uniquely yours. Whether you go for soft pastels or bold brights, your aura nails will surely make a statement.
Embrace the Animal Print Trend in Nail Art and Designs

Nail Art and Designs
Tortoiseshell and Cheetah Print Tips
Animal prints are back in the spotlight for 2025, and tortoiseshell and cheetah are leading the charge. These prints are not just for your wardrobe anymore; they’re making waves in the nail art scene too. Tortoiseshell tips offer a chic, sophisticated look that pairs well with neutral outfits. You can achieve this by layering jelly shades of brown and black over a nude base. On the other hand, cheetah print nails scream boldness and are perfect for those who love to stand out. This involves using a dotting tool to create the classic spots over a beige or gold polish.
Pairing Animal Prints with Accessories
When it comes to fashion, animal prints are versatile enough to be paired with a variety of accessories. Whether you’re sporting a leopard print scarf or a zebra-striped handbag, matching your nails to your accessories can create a cohesive look. Consider using animal print nail wraps for a quick and easy application. They are perfect for those busy mornings when you need to get ready in a flash. Plus, they last longer than regular polish, meaning your style stays intact.
DIY Animal Print Nail Art
Creating animal print nail art at home is easier than you might think, and it’s a fun way to express your creativity. Here’s a simple guide to get you started:
- Choose Your Base Color: Start with a base coat that complements your chosen animal print, like nude for tortoiseshell or gold for cheetah.
- Create the Print: Use a thin brush or a dotting tool to add the animal print design. For tortoiseshell, layer different shades of brown and black. For cheetah, create irregular spots with black polish.
- Seal the Design: Finish with a top coat to protect your design and add a glossy shine.
Experimenting with animal prints on your nails can be a thrilling way to showcase your personal style. The beauty of these designs is in their imperfection, so don’t stress about getting it perfect.
For those looking to explore more nail art ideas, you might want to check out a vibrant collection of nail extension designs that offer a wide range of creative possibilities.
Magnetic and Velvet Nail Art and Designs
Choosing the Right Magnetic Polish
Magnetic polishes are all the buzz right now, and picking the right one can make or break your nail game. The key is to find a polish with a strong magnetic pull. This ensures that the patterns are sharp and clear. Look for polishes that come with a magnetic wand. These wands help create unique designs by guiding the metallic particles in the polish. Some popular shades to try include deep blues, shimmering purples, and classic golds. Remember, the color you choose can totally change the vibe of your nails.
DIY Cat Eye Nail Art
Creating cat-eye nails at home is easier than you think. Here’s a quick step-by-step guide:
- Start by applying a base coat to protect your nails.
- Paint your nails with a magnetic polish of your choice.
- Before the polish dries, hover the magnetic wand over each nail for about 10-15 seconds.
- Move the magnet around to create different designs. Experiment with angles for unique looks.
- Finish with a top coat to seal and protect your design.
With a bit of practice, you’ll be able to achieve salon-quality cat-eye nails right at home.
Trendy Velvet Nail Designs
Velvet nails give a plush, luxurious feel to your manicure. They’re perfect for adding a touch of glamour to any look. To achieve this style, you can use a special velvet-effect polish or apply a velvet powder over wet polish. Velvet nails look stunning in rich colors like burgundy, emerald, and navy. They’re ideal for winter months or any time you want a cozy, chic look.
Velvet and magnetic nails are like the cozy sweaters of the nail world—soft, warm, and perfect for making a statement without trying too hard.
Daisy Delight: Floral Nail Art and Designs
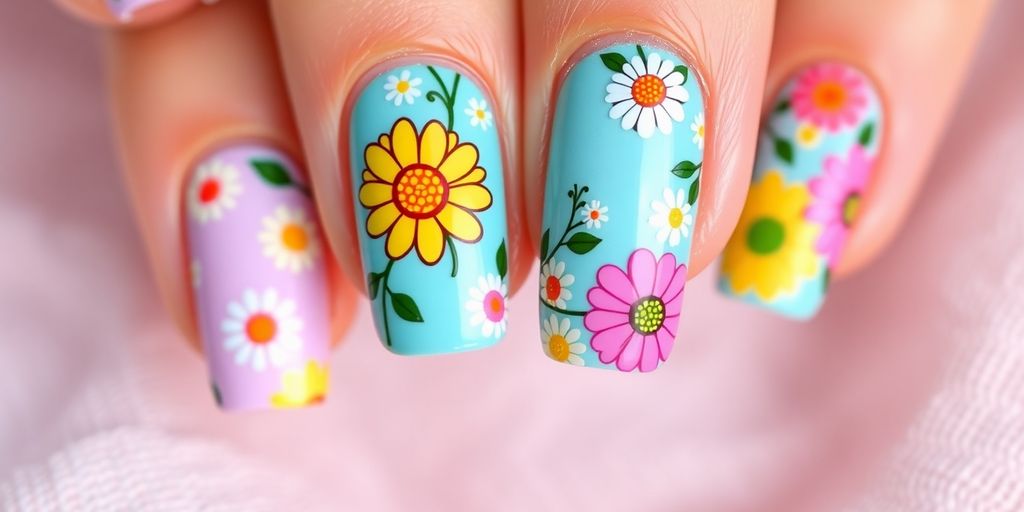
Creating Daisy Nail Art at Home
Daisy nail art is a fun way to bring a touch of nature to your fingertips. You don’t need to be an artist to create these lovely designs at home. Here’s a simple guide to get you started:
- Choose your base color: Start with a light blue or pastel pink polish for a spring-like vibe.
- Paint the daisies: Use a dotting tool or a small brush to create white petals. Start with a small circle in the center of your nail and draw short lines radiating outwards.
- Add the yellow center: Use a yellow polish to dot the center of each flower.
- Seal your design: Finish with a clear topcoat to protect your artwork and add shine.
With a bit of practice, your nails will look like a blooming garden!
Pairing Daisies with Metallic Accents
Daisies on their own are charming, but pairing them with metallic accents can elevate your nail art to a whole new level. Here are a few ideas:
- Gold foil tips: Add a touch of gold foil to the tips of your nails for a classy finish.
- Silver stripes: Use silver striping tape to create geometric patterns alongside your daisy designs.
- Metallic polish: Paint one or two accent nails with metallic polish to contrast with the floral designs.
These metallic touches not only enhance the beauty of the daisies but also add a modern twist to your nail art.
Trendy Floral Nail Designs
Floral designs are always in style, but some trends stand out more than others. Here are a few trendy ideas to consider:
- Pastel florals: Soft pastel colors continue to be popular, especially in spring and summer.
- Negative space daisies: Leave parts of your nails bare to create a minimalist look with daisy patterns.
- Mixed florals: Combine daisies with other floral designs like roses or tulips for a more intricate look.
Embrace your creativity and let your nails blossom with these delightful floral designs. Whether you prefer a simple daisy or a more complex floral arrangement, there’s a design out there for everyone.
Rhinestones and Glam: Nail Art and Designs
Applying Rhinestones to Nails
Adding rhinestones to your nails is like giving them a little sparkle boost. Start by picking a few rhinestones that match your mood or the season. You don’t need a ton—just a few can make a big difference. Grab some nail glue and a pair of tweezers. Carefully place each rhinestone where you want it, and press gently. Let them dry completely before doing anything else with your hands. It’s super easy, and the result is a dazzling set of nails that catch the light just right.
Choosing the Right Base Color
The base color you pick can totally change the vibe of your rhinestone nails. If you want the rhinestones to really pop, go for a dark or bold color like deep red or navy blue. For a more subtle look, a nude or pastel shade works wonders. And if you’re feeling adventurous, try a metallic base for that extra wow factor. The key is to balance the shine of the rhinestones with a color that complements them without overpowering.
Trendy Rhinestone Nail Designs
Rhinestone nail designs are all about creativity. Here are some ideas to get you started:
- Classic French Tips with a Twist: Add a line of rhinestones along the tip for a chic upgrade.
- Accent Nail: Cover just one nail on each hand with rhinestones for a bold statement.
- Pattern Play: Create patterns like stripes or geometric shapes using rhinestones for a fun and unique look.
Rhinestones are a fun way to glam up your nails without going overboard. They’re perfect for special occasions or just when you want a little extra sparkle in your day. Give them a try and see how they can transform your nails into a work of art!
Gradient and Ombre Nail Art and Designs

Nail Art and Designs
Creating a Gradient Effect
Gradient nails are all about the seamless transition from one color to another. The key to a stunning gradient is blending, and there are a few nifty tricks to get it just right. First, choose two or more colors that complement each other. You can use a makeup sponge to dab the colors onto your nails, starting with the lightest shade. Gently blend the colors together on the sponge before pressing it onto your nail. Repeat until you achieve the desired look. Finish with a clear top coat to smooth out any texture and add shine.
Ombre Nail Art Techniques
Ombre nails are similar to gradient nails but often involve a more distinct transition between colors. For a classic ombre, start with a base color and let it dry completely. Then, use a sponge to apply the second color, starting at the tip and working downwards. Subtle shifts in shades can create a beautiful effect. You can also try a reverse ombre by applying the darker color at the base and blending upwards.
Color Combinations for Ombre Nails
Choosing the right color palette is crucial for ombre nails. Here are some popular combinations:
- Pink to White: Perfect for a soft, romantic look.
- Blue to Purple: Gives a mystical, ocean-inspired vibe.
- Black to Red: Bold and dramatic, ideal for evening wear.
Ombre and gradient nails are not just a trend; they’re a canvas for your creativity. Experiment with colors and techniques to find your unique style.
Metallic Magic: Nail Art and Designs
Incorporating Metallic Hues
Metallic hues are all the rage in nail art, adding a touch of glamour to any look. Whether you opt for a full metallic set or just an accent nail, these shiny colors are sure to catch the eye. Metallic shades can range from bold golds and silvers to more subtle bronze and rose gold tones. These colors not only make a statement but also pair well with various outfits, making them versatile for any occasion.
DIY Metallic Nail Art
Creating your own metallic nail art at home is easier than you might think. Here’s a simple guide to get you started:
- Choose Your Base Color: Start with a solid base color that complements your metallic shade. Neutral tones like beige or light pink often work well.
- Apply Metallic Polish: Use a metallic nail polish or powder to create your desired effect. You can go for a full metallic look or just add metallic tips.
- Seal with a Top Coat: Finish with a clear top coat to ensure your metallic design lasts and shines.
Trendy Metallic Nail Designs
For those looking for inspiration, explore over 40 unique metallic nail ideas perfect for the holiday season. From intricate designs to simple metallic stripes, there’s a look for everyone. Metallic decals are another fun way to jazz up your nails without too much effort. Just apply and seal with a top coat!
Tip: Don’t be afraid to mix metallics with other finishes like matte or glossy. This contrast can create a stunning effect that’s both modern and chic.
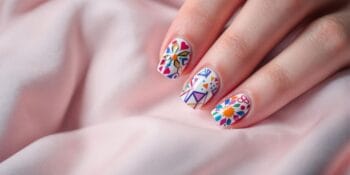
Abstract and Minimalist Nail Art and Designs
Creating Abstract Nail Art
Abstract nail art is all about letting your creativity run wild. You don’t need to stick to any rules. Just grab a few colors that speak to you and start painting. Bold lines, random shapes, and unexpected color splashes can turn your nails into tiny canvases. The beauty of abstract art is that no two designs are the same, so each nail can tell its own story. Try using a small brush for details and a sponge for blending colors.
Minimalist Nail Art Techniques
Minimalism in nail art is about keeping things simple yet stylish. Think of it like a whisper rather than a shout. Start with a neutral base, like a soft beige or pale pink, and add small accents. Tiny dots, thin lines, or a single stripe can make a big impact. Here’s a quick list to get you started:
- Choose a neutral or pastel base color.
- Use a thin brush for precise lines or dots.
- Keep embellishments to a minimum to maintain the minimalist vibe.
Trendy Minimalist Designs
Minimalist designs are trending because they’re versatile and chic. They suit any occasion, whether you’re at work or out for the evening. Some current favorites include:
- Negative space designs that let parts of your natural nail show through.
- Geometric patterns with clean lines and shapes.
- Simple metallic accents that add a touch of glam without going overboard.
Minimalist nail art proves that less can indeed be more. It’s about finding beauty in simplicity and appreciating the elegance of understated designs. Whether you opt for abstract creativity or minimalist sophistication, your nails can be a reflection of your personal style.
If you’re looking to elevate your nail game, minimalist nail art is the way to go! These simple yet stunning designs can make your nails look chic and stylish without being over the top. Want to learn more about how to create these beautiful looks? Visit our website for tips and inspiration!
Wrapping Up: Your Nail Art Adventure Awaits!
So there you have it, a bunch of fun and trendy nail art ideas to try out! Whether you’re into the moody vibes of aura nails or the playful charm of pink bows, there’s something for everyone. Nail art is all about expressing yourself, so don’t be afraid to mix and match styles or colors. Grab your favorite polishes, maybe a few rhinestones or stickers, and get creative. Remember, it’s not just about following trends but making them your own. Happy painting, and may your nails always be on point!
Frequently Asked Questions
What are aura nails?
Aura nails are a trendy nail design where colors blend together, often using a sponge, to create a soft, moody look that reflects your personal vibe.
How can I do animal print nails at home?
You can use nail stickers or decals to easily create animal print designs like cheetah or tortoiseshell at home without needing a salon visit.
What is the cat eye nail trend?
Cat eye nails use magnetic polish to create a shimmering, reflective line across the nail, resembling a cat’s eye. It’s a fun and trendy look for 2025.
How do I apply rhinestones to my nails?
To apply rhinestones, first paint your nails with a base color. Then, use nail glue or a clear top coat to stick the rhinestones onto your nails.
What is the difference between gradient and ombre nails?
Gradient nails smoothly transition between colors on a single nail, while ombre nails transition from one color to another across all nails.
Can I create metallic nail designs at home?
Yes, you can easily create metallic nail designs at home using metallic nail polish or nail stickers for a shiny, trendy look.

Seja o primeiro a comentar!